

Wavefront and Collimation Manual
How to measure your telescope from a few out-of-focus star images with Functions › Wavefront and Collimation…: capturing the images, the dialog, collimating step by step, the results, Field mode across the sensor, and the focal length, focus walk and backlash.
A star photographed slightly out of focus shows a ring, or donut, that is a picture of your telescope's mirror or lens. Every collimation error and figure error changes the ring in its own way. Functions › Wavefront and Collimation… fits a diffraction model of your telescope to one or more such images and tells you:
- the wavefront error across the aperture, as a map, in waves and nanometers;
- the aberrations that make it up (astigmatism, coma, spherical, trefoil and more), as annular Zernike terms;
- the Strehl ratio at several wavelengths, the PSF a perfect star would have, the MTF and the encircled energy, each next to a perfect telescope of the same aperture and obstruction;
- what to adjust: which way the coma points, which way astigmatism stretches a star near focus, and what usually causes each error in your type of telescope;
- the seeing during the capture and the exact focus position of every image;
- in Field mode, how astigmatism, coma and focus change across the sensor: the design's field astigmatism, a misaligned secondary, a tilted camera and field curvature.
It works on the frames you select in a dataset: stacked images (SharpCap snapshots, AutoStakkert or BiggSky stacks) or the frames of a video.
Editions. BiggSky SSE Pro, DSO and Universe have the full analysis, including Field mode. BiggSky SSE Lite has the collimation check: the Pairs and Each position separately modes, with the Steps and Summary tabs. It does not include the through-focus analysis, Field mode, the Zernike table, PSF/MTF, the focus and focuser diagnostics, or the saved full result. The Free edition does not include it.
Quick Start
- Capture the star out of focus, as described in Capturing the images below. Two positions on each side of focus is ideal; one on each side is the minimum.
- Add the images to your project as a dataset and select it. Deselect any frames you do not want with Select.
- Choose Functions › Wavefront and Collimation…
- Fill in your telescope the first time: aperture, focal length, central obstruction, spider, pixel size and the filter's wavelength. BiggSky remembers it by name, so next time you only pick it from the list.
- Say how the images sit around focus: passing through focus (in the order they were taken) or all on one side, and whether the first selected frame is inside or outside focus.
- Press Analyze. A two-sided series of about ten images takes 1–6 minutes with the GPU on.
The results open in a window with six tabs and are saved in a Wavefront folder beside the images.
Capturing the images
Where to put the focuser. The best positions put donuts about 20 and 30 times the seeing across on each side of focus. The dialog works out the distances for your telescope as you type. For a 360 mm f/8 at 1.5″ seeing that is about 3 and 5 mm of focuser travel inside focus and the same outside.
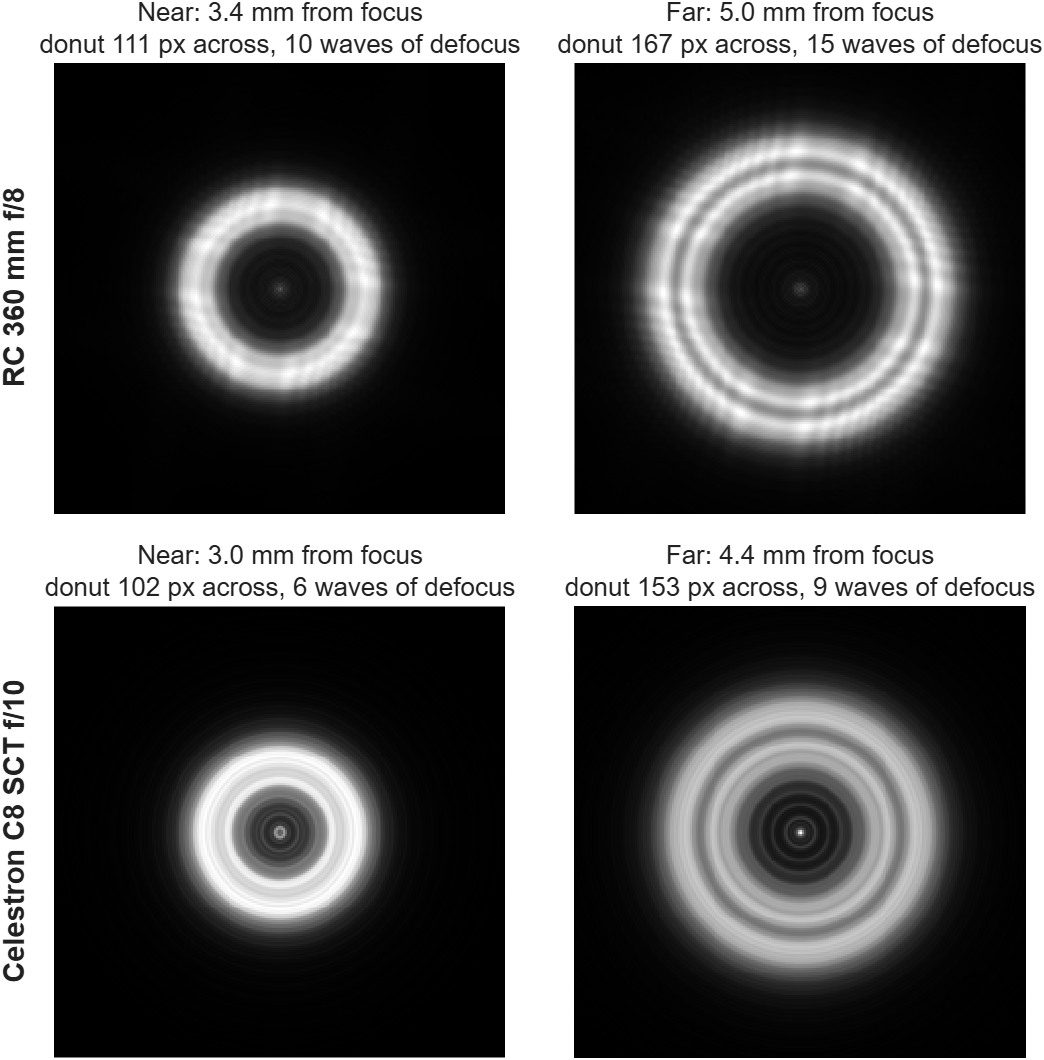
How many images. These figures come from refitting parts of a 20-image series against the whole:
| Images | Typical error |
|---|---|
| 1 image | 0.05–0.2 waves. Not reliable on its own. |
| 1 inside + 1 outside focus | 0.03–0.05 waves |
| 2 inside + 2 outside focus (recommended) | 0.02–0.04 waves |
| 10 spread through focus | about 0.02 waves |
Images on both sides of focus matter more than the number of images. With images on only one side, spherical aberration and astigmatism cannot be told apart from uneven illumination of the mirror.
Exposure. Use short sub-frames (0.1–0.25 s) and stack 50–200 of them at each position. Longer sub-frames blur the ring with seeing, and the fit then sees less detail. Do not let the ring saturate.
Which star. Use a bright star near the center of the field, high in the sky. For Field mode, see Field mode: across the sensor below.
Filter. Use a color filter (a red filter steadies the seeing) and enter its central wavelength.
Inside or outside? Inside focus means the camera is too close to the telescope.
The dialog
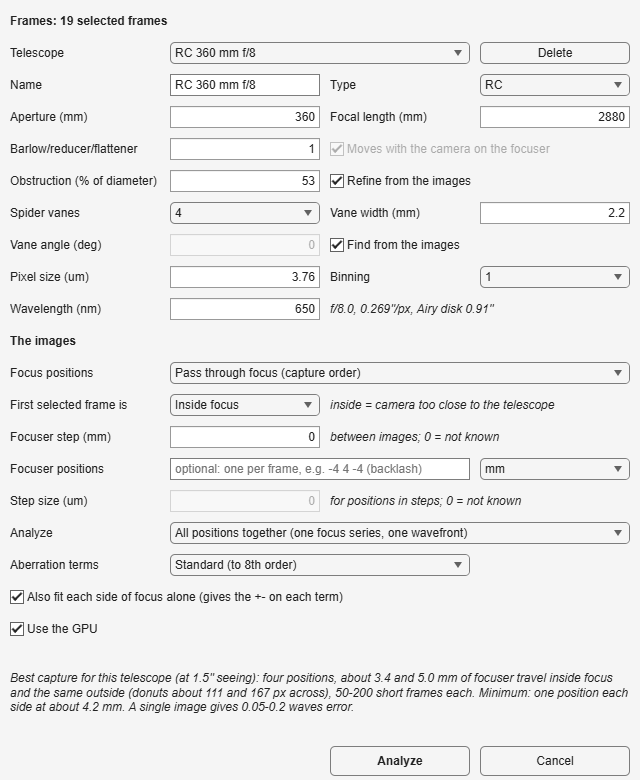
| Setting | What it means |
|---|---|
| Telescope | Your saved telescopes. Pick New telescope… to add one; Delete removes the one shown. |
| Type | RC, Cassegrain, SCT, Newtonian, Refractor or Other. It chooses the collimation advice. |
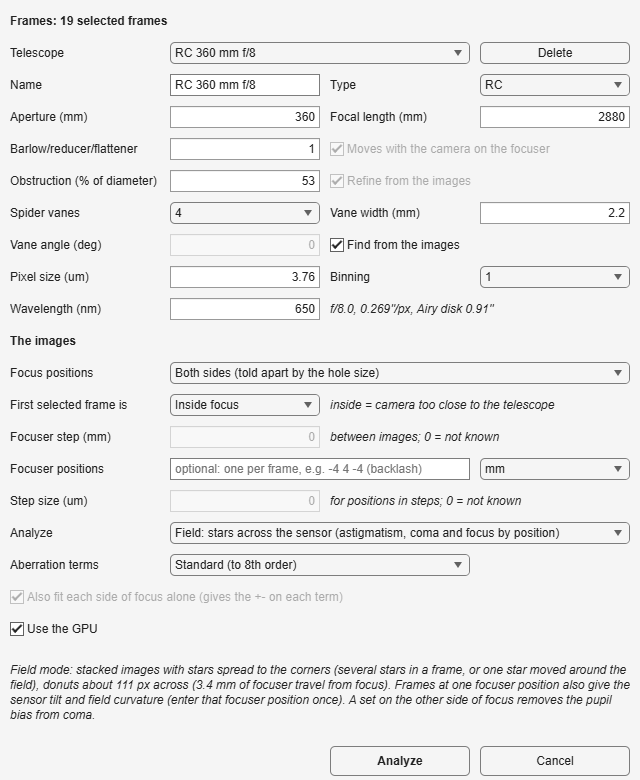
| Aperture, Focal length | In millimeters, for the telescope alone. Use the measured focal length if you have one (see The focal length below). The f-ratio, pixel scale and Airy disk at the camera are shown beside the wavelength. |
| Barlow / reducer / flattener | The factor of a Barlow (2, 2.5…), reducer (0.63, 0.8…) or field flattener in front of the camera; 1 for none. A flattener's factor is the focal length with it divided by the telescope's own, often close to 1. It multiplies the f-ratio and image scale. Moves with the camera on the focuser applies once the factor is not 1. Tick it when the Barlow or reducer is focused together with the camera, as it usually is: 1 mm of focuser travel then moves the focus the factor squared at the sensor (4 mm with a 2× Barlow), and BiggSky gives the recommended distances, focuser positions and backlash as focuser travel. Untick it for a flattener or reducer fixed to the telescope ahead of the focuser, which moves only the camera. |
| Obstruction | The central obstruction as a percentage of the aperture's diameter. Tick Refine from the images to measure it. The measurement needs images on both sides of focus and is then saved with the telescope. The measured value is often larger than the secondary mirror, because baffles add to it. |
| Spider vanes, Vane width | 0 for an unobstructed refractor; 3 or 4 for most reflectors. |
| Vane angle | Tick Find from the images to measure it. |
| Pixel size, Binning | The camera's pixel size in micrometers and any binning used at capture. Color (Bayer) cameras are handled automatically. |
| Wavelength | The center of your filter, in nanometers. Strehl is quoted at this wavelength and at others too. |
| Focus positions | Pass through focus when the images were taken while moving the focuser one way through focus. All inside or All outside when every image is on one side. In Field mode, Both sides sorts the images by the size of the donut hole, which differs on the two sides of focus. |
| First selected frame is | Which side of focus the first selected frame is on. |
| Focuser step | Optional. The focuser travel between consecutive images, in millimeters. When given, BiggSky works out the telescope's real focal length from the donut sizes and, when it differs from the one entered by more than 2%, fits again with it. |
| Focuser positions | Optional. The focuser's position for each selected frame (or each focus position), in mm or in steps, separated by spaces or commas. BiggSky then reports the focal length, how closely the focuser follows its commands, and its backlash (see Focuser backlash below). In Field mode, one number says every frame was taken at that position. |
| Step size | For positions in steps: the size of one step in micrometers, if known. It turns the result into a focal length. |
| Analyze | All positions together fits one wavefront to a focus series. Each position separately fits each image alone. Pairs fits each inside/outside pair as one step. The last two are for a series of collimation adjustments (see below). Field fits every star across the sensor (see Field mode below). |
| Aberration terms | Standard fits terms up to 8th order. High goes to 10th order and is slower. Fewer terms would bias astigmatism, so there is no lower setting. |
| Also fit each side of focus alone | Gives a ± on each term: half the difference between the inside-only and outside-only fits. |
Collimating step by step
What to capture after each adjustment. Take two short stacks, one about 4 mm inside focus and one about 4 mm outside (for a 360 mm f/8; the dialog shows the distances for your telescope). Nothing needs to be exact: BiggSky measures where each image really was, so you never have to refocus to a set position. Images on both sides matter more than the number of images. One image on each side is good to about ±0.03–0.05 waves. Two images on the same side are no better than one; one image alone is good to only 0.05–0.2 waves.
Then:
- Add the stacks to the dataset in the order you took them: inside, outside, inside, outside…
- Choose Pairs, and set First selected frame is to the side you started on.
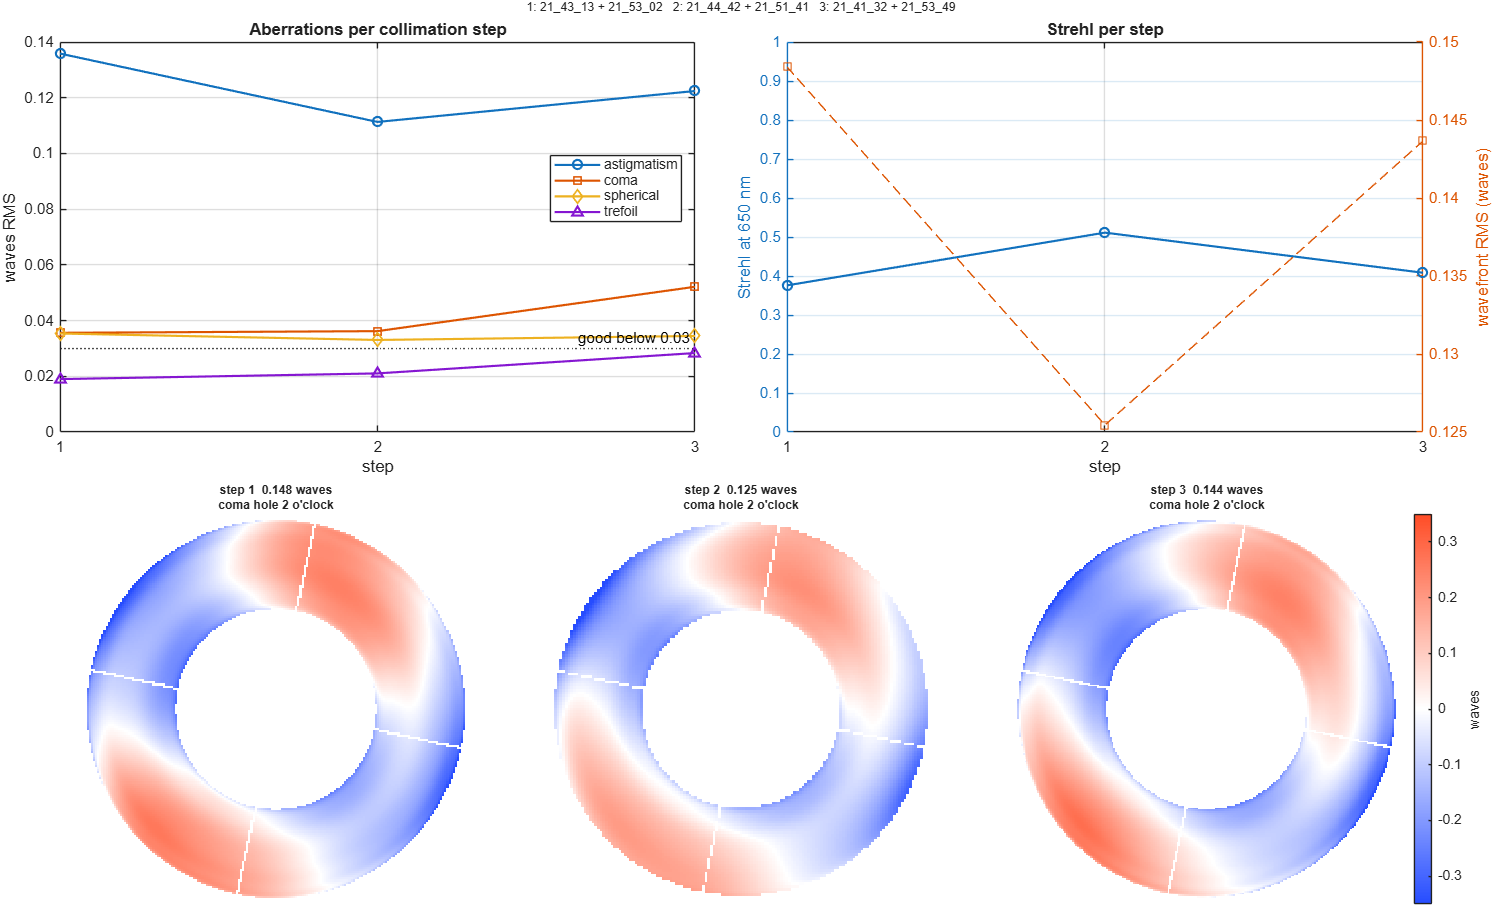
The Steps tab plots astigmatism, coma, spherical and Strehl for each step, with a small wavefront map and the coma direction under each. Each position separately works with one image per step, but use it only to watch a trend.
Before you start, run one through-focus series with Refine ticked. It measures the obstruction, and the steps then use the measured value.
The order of adjustment for a two-mirror telescope (RC, Cassegrain):
- Mirror spacing first. Spherical aberration depends only on the distance between the mirrors; moving the camera or changing spacers changes where you focus, not the spherical. Move the secondary (or primary) along the axis until focus falls at the designed back focus. Measure the spherical at two secondary positions and interpolate. Do this first because moving a mirror along the axis disturbs its tilt.
- Secondary tilt to remove coma at the center of the field. The Summary says which way the hole of an inside-focus donut sits.
- Primary tilt for astigmatism. In an RC, astigmatism on axis with little coma usually means the primary is tilted and the secondary has hidden its coma. Set the primary with star shapes in the field corners (a Field mode run measures them), then go back to step 2.
- Repeat 2 and 3 until both are below about 0.03 waves, then confirm with a through-focus series (two images each side).
The results window
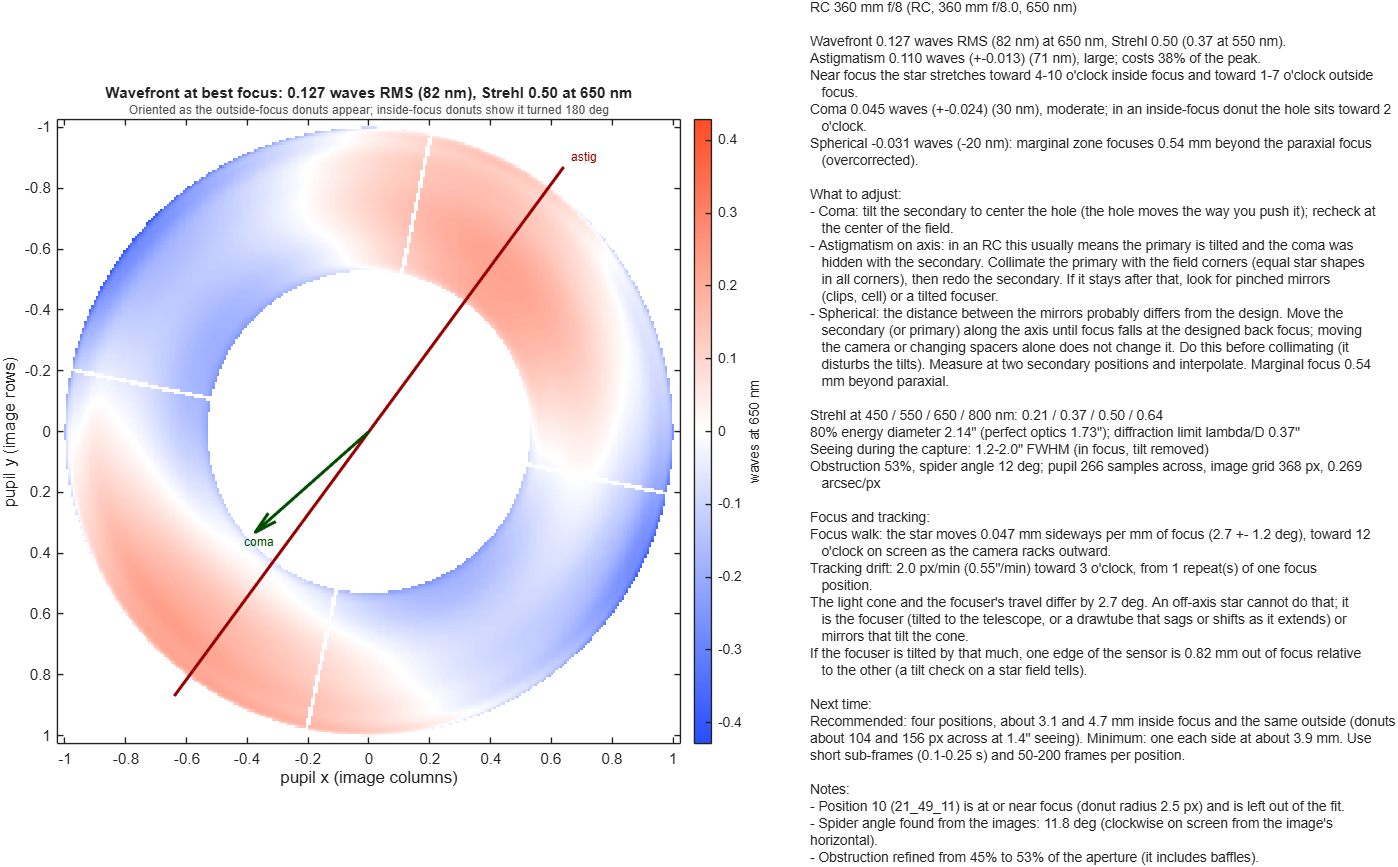
- Summary: the wavefront map at best focus, the numbers, what to adjust, and the recommended capture for next time. The map is oriented as the outside-focus donuts appear on screen. The red line marks the astigmatism axis and the green arrow the coma.
- Zernikes: every aberration term in nanometers, with error bars when both sides of focus were fitted. Below it, an error budget shows what each aberration alone would cost in Strehl.
- PSF and MTF: the star image a perfect telescope and yours would give, with and without the session's seeing; the MTF; the encircled energy; and Strehl from 450 to 800 nm.
- Focus: the ring size of every frame; the fitted focus position of every image (with the focuser's step size); the seeing per image against sub-frame exposure; Strehl through focus, with the depth of focus; and where the star sat on the sensor as focus changed (see Focus walk below).
- Fit: the data, the model and the difference for up to eight images. A good fit leaves only fine mottling.
- Interferogram: a synthetic single-pass interferogram, to compare with a bench test, and the zonal profile (the rotationally symmetric part, which shows spherical aberration and zones).
- Field and Field stars (Field mode only): see Field mode below.
The folder Wavefront\<project>_<dataset>_<date>_<time> holds:
- a PNG of each tab;
Wavefront_Zernikes.csv;Wavefront_Report.txt, with the summary and every position;Wavefront_Steps.csvin step mode;Wavefront_Field.csv(one row per star) andWavefront_Field.txtin Field mode;Wavefront.mat, the full result.
Field mode: across the sensor
The other modes measure the telescope at one point, the star you photographed. Field measures it across the whole sensor. It finds every out-of-focus star in the selected images, fits each one on its own, and maps how the aberrations and the focus change with position. That tells you whether the corners of your images are limited by the design, by collimation, or by the camera.
Capturing. Use the same distance from focus as for a single star; the dialog gives it when Field is chosen (about 3.4 mm of focuser travel for a 360 mm f/8). Then either:
- point at a field with several bright stars spread out to the corners, such as an open cluster, and take one stack; or
- put one star at the center, then near each corner and edge, and take one stack at each place.
Stack 50–200 short frames each, as for a single star. Keep every frame at one size and binning.
- Keep the focuser at one position for all the frames and enter that position once under Focuser positions. Then the focus of each star also measures the camera's tilt and the field curvature.
- Capture a second set on the other side of focus if you can. It removes a small bias from the coma (see below) and measures it.
The dialog. Choose Field under Analyze and say where the images are under Focus positions: All inside focus, All outside focus, or Both sides, which sorts the images by the size of their donut holes. With images on one side only, the side must be right. One image cannot tell inside from outside focus: if the side is wrong, every astigmatism axis turns 90°, while the sizes and the coma stay the same.
The Field tab.
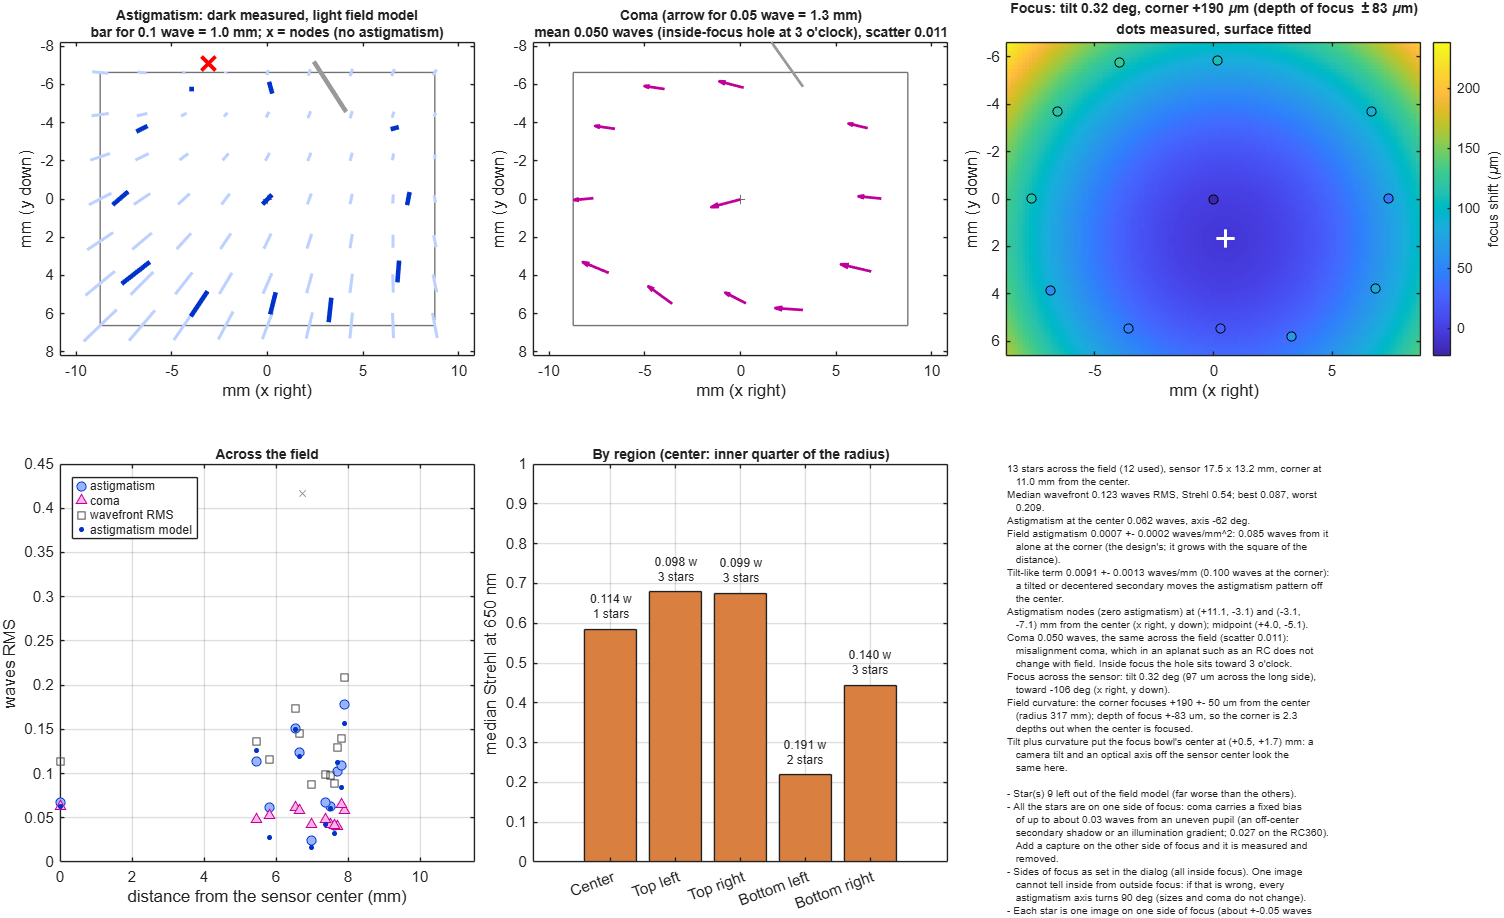
- Astigmatism: a bar at each star, as long as the astigmatism and along its axis (dark), over the fitted field model (light). Red crosses mark the nodes, where the model has no astigmatism.
- Coma: an arrow at each star.
- Focus: the focus surface across the sensor, with each star's own focus as a dot. It needs four or more stars at one focuser position.
- Across the field: astigmatism, coma and RMS against the distance from the sensor center.
- By region: the median Strehl at the center and in each quarter of the sensor.
The Field stars tab shows the stars where they sat on the sensor. The other tabs show the star nearest the center, as a single-image result.
Reading the maps.
- Astigmatism that grows with the square of the distance from the center is the design's field astigmatism. Every RC and Cassegrain has it; a corrector or flattener reduces it. The summary gives its size at the sensor corner.
- Nodes off center. In a well-aligned telescope the astigmatism pattern is centered and the two nodes sit either side of the center. A tilted or decentered secondary moves the pattern sideways; the summary reports this as a tilt-like term. Fix it with the secondary and primary as in Collimating step by step.
- Coma the same everywhere. An RC is aplanatic: by design it has no coma anywhere in the field, so coma from a misaligned secondary is the same at every star. Remove it at the center and it is gone everywhere. In a Newtonian or SCT, coma also grows with the distance from the center by design.
- Focus tilt means the sensor is not square to the light. Correct it with a tilt adapter on the camera, or look for a focuser that sags.
- Focus curvature is the curved field of the telescope. The summary says how many depths of focus the corner is from the center. More than about one depth of focus is worth a field flattener.
- Tilt or off center? A tilted camera and an optical axis that does not cross the sensor center look the same in the focus surface. Rotate the camera 90° and measure again: a tilted camera turns with it, an off-center axis does not.
How accurate. Each star is one image on one side of focus, good to about ±0.05 waves alone; the field models average them. With every image on one side, coma carries a fixed bias of up to about 0.03 waves from an uneven pupil: an off-center secondary shadow or an illumination gradient. It reads as coma of opposite signs inside and outside focus. With images on both sides BiggSky separates the two and reports the true coma.
Example. On a 360 mm f/8 RC (13 stars, one frame): field astigmatism 0.085 waves at the sensor corner, coma 0.050 waves the same across the field, the sensor tilted 0.32° to the focus, and the corner 0.19 mm from the center's focus, 2.3 depths of focus. Field mode runs on stacked images: at most 40 selected frames are used.
The focal length
The focal length on the label is rarely exact. In a two-mirror telescope it changes with the distance between the mirrors, and a flattener, reducer or Barlow changes it again. BiggSky uses it to work out the f-ratio, the scale of the diffraction pattern on the sensor, and how far each image is from focus, so enter the measured value when you have one. There are two ways to measure it:
- From the focuser. Enter the Focuser step (or the Focuser positions with a known step size). BiggSky compares the change in donut size with the focuser travel and reports the focal length. When it differs from the one entered by more than 2%, BiggSky fits again with it and says so.
- By plate solving. Solve a star-field image taken with the same camera and optics in ASTAP, astrometry.net or another solver, and read the image scale in arcseconds per pixel. Then work out the focal length as below.
Focal length (mm) = 206.265 × pixel size (µm) ÷ image scale (″/pixel).
For example, a 360 mm RC sold as 2880 mm solved at 0.2597″/pixel with 3.8 µm pixels: 3018 mm. Fourteen frames from ten nights agreed within 1 mm.
When you plate solve:
- Solve a saved frame. NINA and other capture programs solve while imaging, but they do not save the result in the image file; the focal length in the file's header is the value you typed in.
- Low stars read short. Atmospheric refraction squeezes the image, so the solved focal length reads short by about 0.05–0.1% at 30–40° altitude (about 2 mm on 3000 mm). Prefer frames taken high in the sky.
- Enter the telescope's own focal length. If the solved image was taken through a Barlow, reducer or flattener, divide by its factor and enter the factor under Barlow / reducer / flattener. If you do not know the telescope's own focal length, enter the solved one with a factor of 1: the fit is the same, and only the mirror-spacing advice for spherical aberration is scaled slightly wrong (by the factor squared).
- It drifts a little. In an RC the focal length changes slightly as the tube cools and the mirror spacing changes: about 2 mm over a night on a 360 mm RC.
Focus walk
If you focus with the camera's focuser, the star should stay put on the sensor as you rack in and out. If it slides sideways, the light cone is not parallel to the focuser's travel. The Summary and the Focus tab give how far it moves per millimeter of focus, as an angle and a direction on screen. That angle has three possible causes:
- the focuser is tilted to the telescope;
- the drawtube sags or shifts sideways as it extends;
- the mirrors are misaligned so the cone is tilted.
An off-axis star cannot cause it.
The mount's tracking drift also moves the star, and in a series taken one way through focus, time and focus change together. BiggSky separates the two using the frame times (from SharpCap's .CameraSettings.txt files, a video's time stamps, or the file dates). It is reliable only if you return to one focus position later in the session. The easiest way is to finish the series with one more image at the first position. Without that, BiggSky reports the combined motion and says it could not separate them.
To tell the causes apart:
- check the tilt across a star field (a tilted focuser defocuses one edge of the sensor; a Field mode run measures it);
- repeat the series pointing elsewhere in the sky (sag changes with the direction of gravity);
- repeat it after collimating (a tilted cone changes with the mirrors).
Focuser backlash
BiggSky measures where each image really was to a few hundredths of a millimeter, so it can check the focuser. Enter the focuser's position for each frame (Focuser positions) and approach at least one position from both directions. For example, go in to −4 mm, out to +4 mm, then back in to −4 mm. The Focus tab then plots commanded against measured position, with each point marked by the direction it was approached from, and reports:
- the backlash: how much the position reached depends on the direction it was approached from;
- how closely the steps follow the commands;
- the focal length (in mm, or for steps of a known size).
Keep the series short: focus drifts as the telescope cools, and a drift between the two visits reads as backlash. The same in-out-in pattern also lets BiggSky separate the mount's drift from focus walk.
What to adjust
Coma means the optical axis is tilted or off center. In an RC, Cassegrain or SCT, adjust the secondary. In a Newtonian, adjust the primary. The Summary says which way the hole of an inside-focus donut sits. Turn the screws until it is centered.
Astigmatism on axis in an RC usually means the primary is tilted and the coma was hidden by tilting the secondary to match.
- Collimate the primary using stars in the field corners, until the star shapes are the same in all four corners. A Field mode run shows the corners side by side.
- Redo the secondary.
If astigmatism remains, look for pinched optics (mirror clips, the cell, a retaining ring that is too tight) or a tilted focuser.
Spherical aberration cannot be fixed by collimation. In a two-mirror telescope it means the distance between the mirrors differs from the design. Moving the camera or changing spacers does not change it. Move the secondary (or primary) along the axis until focus falls at the designed back focus. In an SCT, put the camera at the designed back focus, because the focus knob moves the primary and so changes the spacing. The Summary gives the distance between the focus of the mirror's edge and that of its center.
Trefoil is three-fold stress, often from mirror clips or the mirror cell.
Astigmatism or soft focus only in the corners is usually the design's field astigmatism and field curvature, not collimation. A Field mode run separates them from a tilted camera or secondary.
Tips and troubleshooting
- "All images are on one side of focus": the numbers are usable for comparing images, but spherical and astigmatism are biased. Add images from the other side.
- A position "fits far better on the other side of focus": the focus order setting did not match the images. BiggSky moved that position and says so; check the setting next time.
- Which side is which: with three or more images and no focuser positions, BiggSky also uses the size of the donut holes. Spherical aberration makes the hole smaller on one side of focus than on the other.
- The image at focus is left out: a star with no hole carries little information and is skipped.
- Field mode: "needs every frame at one size and binning": select only the frames of one capture setting.
- Field mode: "the stars cover too little of the sensor": add stars near the edges and corners. The field models need stars in most quarters of the sensor.
- Field mode: a star "left out of the field model": that star fitted far worse than the others, usually because another star or the frame edge cuts its ring.
- Slow: turn on Use the GPU. Without a GPU a ten-image series takes several minutes.
Examples from a 360 mm f/8 Ritchey–Chrétien. See also the Wavefront overview and the full BiggSky manual.