

SER Tools Manual
How to compress SER captures losslessly and prove each one before deleting anything — the Compress and Decompress tabs, the sertool command line, and serview. SER Tools is free, and installs and runs on its own.
SER Tools makes SER astronomy captures smaller without changing a single pixel, and proves each one is readable before you delete anything. It is free, it is a standalone application with its own installer, and you do not need BiggSky to use it.
High-speed imaging fills a drive faster than anything else in astrophotography: planetary, lunar and solar captures run to thousands of frames each, several a night. A typical capture comes back at roughly half its size, sometimes much less, and comes back exactly as it went in.
What you get
One installer puts in three programs:
| Program | What it is |
|---|---|
| SER Tools | The window. A Compress tab and a Decompress tab, each with a list of files you tick and a row of options. |
| sertool | The same work at a command prompt, for scripts, scheduled tasks and machines you drive remotely. |
| serview | A small player for .ser and .ser.mj2. It needs no MATLAB Runtime, so it is the one to pass on with a capture. |
All three come for Windows, macOS and Linux, and an archive written on one platform opens on the others.
Compressed captures go straight into BiggSky. BiggSky reads .ser.mj2 directly, so there is no need to decompress a capture before stacking it.
Quick Start: compress a night's captures
- Open SER Tools and stay on the Compress tab.
- Beside Source, click Folder… and choose the folder your captures are in. Subfolders are included. The list fills in straight away.
- Click Scan. Each file is opened and the list fills in frame count, pixel size, bit depth, capture rate and length, so you can see what you are about to process.
- Tick the files you want in the Use column, or click Select all.
- Leave verify ticked and delete sources clear.
- Click Compress.
Each file is compressed, then read back and checked against the original. The Compressed, Ratio, Verified and Status columns fill in as it goes.
Nothing is deleted. When you are satisfied the results are good — decompress one and compare it, or simply keep the originals for a while — run it again with delete sources ticked and Already compressed set to verify and delete source, and the sources will go as each one proves itself.
The file list
Both tabs list the files found under Source, with one row per file. Click a column heading to sort by it, click again to reverse: sort on size to put the biggest captures first, on folder to bring one night together, or on status to see what has already been done.
| Column | What it shows |
|---|---|
| Use | The tick box. Only ticked files are processed. |
| File, Folder | Where it is. |
| Size (GB) | The file as it is now. |
| Frames, Pixels, Depth, FPS, Length | Filled in by Scan, read from the capture itself. |
| Compressed, Ratio | The result, once it has been done. |
| Engine | Which encoder did it — the GPU or the built-in one. |
| Verified | yes once the result has been read back and matched. |
| Status | What happened to this file. |
Selecting rows and ticking are separate things. Shift-click a range or ctrl-click a scattering to highlight them, then tick one box to tick the lot. Select all and Select none act on the highlighted rows when there are any, and on everything when there are not.
The Decompress tab lists the same things with two differences: Original is the size of the capture the archive came from, and Layout is how the pixels are packed inside the .mj2, which is not the same as the camera's bit depth.
Options on the Compress tab
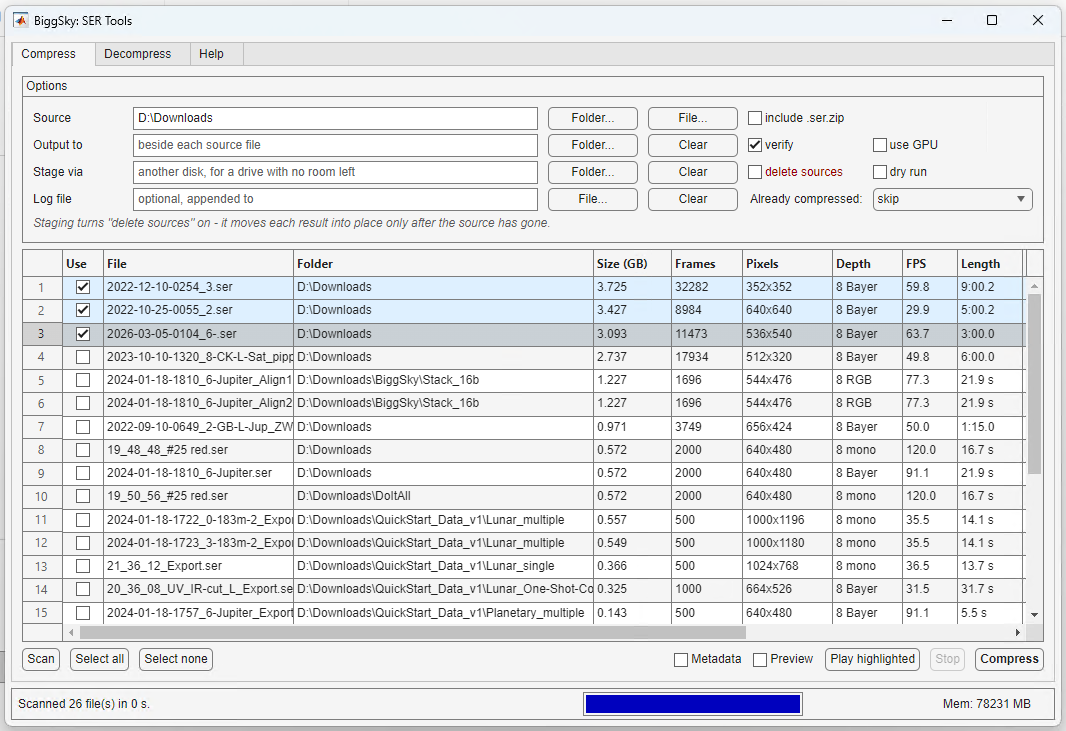
| Option | What it does |
|---|---|
| Source | The folder, or a single file. Folder… and File… browse for one; you can also type or paste a path. |
| include .ser.zip | Also list zipped captures. sertool reads them directly — there is no need to unzip first. |
| include .ser.mj2 | Also list archives that are already done, so one look at a folder says what has been compressed and what has not. There is nothing to compress in an archive, so it is checked against the digests stored inside it instead, and never deleted. |
| Output to | Where results go. Empty means beside each source file. |
| verify | Read each result back and check it against the original. On by default. Turning it off also turns off deleting. |
| use GPU | Use the NVIDIA encoder where there is one. See below. |
| Stage via | Write results to another disk first, then move them back once the source has gone. For a drive with no room left to work in. Staging turns delete sources on, because that is the only way it can work. |
| delete sources | Delete each source once its own result has verified. Off unless you ask for it, and shown in red. |
| dry run | List what would happen and touch nothing. |
| Log file | Append a timestamped record of the run to a file of your choosing. |
| Already compressed | What to do about a capture that already has an archive beside it: skip (the default), recompress, or verify and delete source. |
verify and delete source is the one that turns a drive full of half-finished work into a tidy one. It takes the archive that is already there, checks every frame of it, and removes the .ser only if the check passes — without compressing anything again.
The buttons
Scan opens the ticked files — or all of them, if none are ticked — and fills in the detail columns. It reads headers and a frame or two, not the whole capture, so it is quick even on a folder of large files.
Compress starts the run. While it is running, Stop finishes the file in hand and stops. The status bar along the bottom shows the file being worked on and the progress of the run as a whole.
Files are done smallest first, so a nearly full drive unblocks itself: the small captures free space early, and the large ones have somewhere to go by the time their turn comes.
The Decompress tab
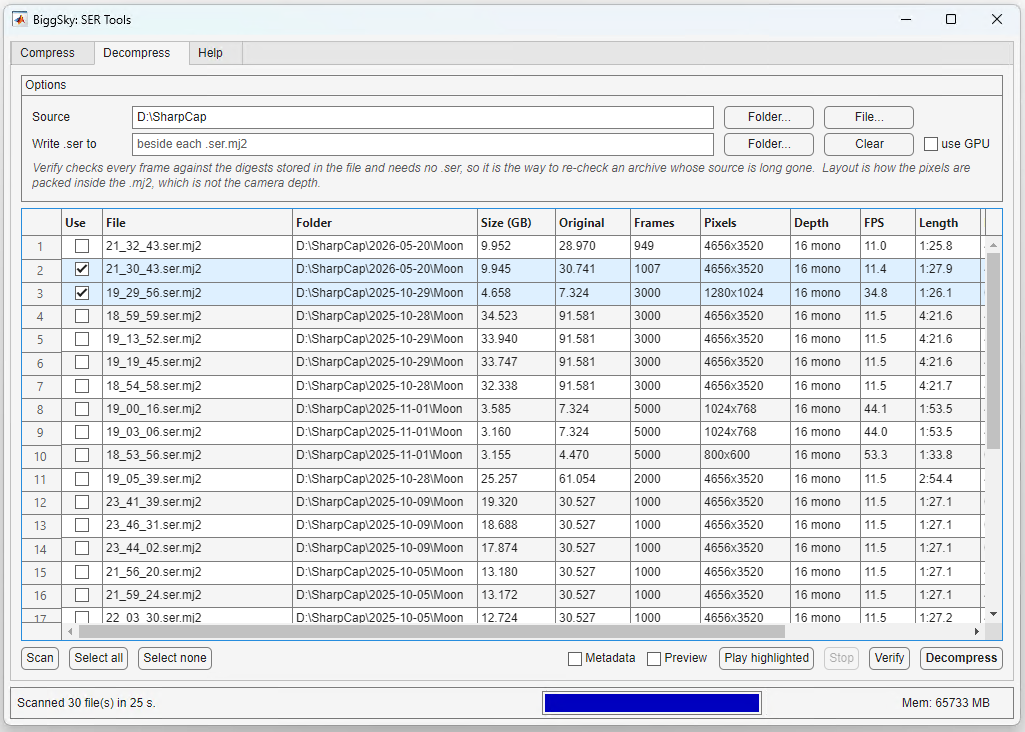
Source and Write .ser to work the way the Compress tab's do; empty output means beside each archive. Opening this tab with nothing chosen starts it in the Compress tab's folder, which is where compressing wrote the archives.
Four buttons act on the ticked rows:
| Button | What it does |
|---|---|
| Verify | Check every frame against the digests stored inside the file. |
| Decompress | Write the .ser back out. |
| Upgrade | Add the recovery box and the header and timestamp signatures to archives written by an earlier version. Nothing is decoded or re-compressed — one pass per file. |
| Recover | Salvage an archive whose tail was lost. |
Verify needs no .ser to compare against. The digests are inside the archive, so this is how to re-check a capture whose original is long gone — before a backup, after a disk move, or whenever you want to know an old archive is still sound.
Recover is for an archive that was interrupted: a copy that stopped half way, a disk that filled. It writes a .ser holding every frame that survived, each checked against its stored signature, with the frame count corrected. Frames that fail their signature are dropped and reported. It is the recovery box at the front of each archive that makes this possible — without one, an archive that loses its tail cannot be opened at all.
Looking at a capture
Three controls sit at the bottom of both tabs and follow the highlighted row, whatever is ticked:
- Metadata opens a panel listing what the file's header holds — observer, instrument, telescope, timestamps, color layout.
- Preview shows a frame.
- Play highlighted runs through the capture, and Stop ends it.
Frames are subsampled and contrast stretched on the way to the screen, so a 4656 × 3520 16-bit lunar frame is legible without pulling the whole movie into memory. Double-clicking a row does the same as highlighting it and turning Preview on.
A one-shot color capture looks blue or green here. That is correct: it is shown as the sensor recorded it, before white balance.
The Log tab
A windowed program compiled with no console has nowhere to print, so everything the run says about what it compressed, skipped or failed is kept in a log file and shown here. Refresh re-reads it, follow the end jumps to the newest lines, and Open folder and Copy path get you to the file itself. Only the last 2000 lines are shown; the file holds the rest.
The About tab
The version, and the three things that are otherwise hard to find:
- Command line: the folder
sertoolis installed in — it has no Start menu entry and sits somewhere nobody would guess. - Command prompt here (Terminal here on macOS and Linux) opens a shell already in that folder, with
sertool helpprinted. - Check for update asks the BiggSky server what the current version is. Nothing here runs on its own, and the only thing sent is the question.
sertool, at the command line
The same work without the window, for scripts, scheduled tasks and machines you drive over a remote session. On macOS and Linux it is typed ./sertool, in the folder it is installed in.
sertool compress   <in.ser|in.ser.zip> [out] [-noverify] [-nogpu] [-quiet]
sertool decompress <in.ser.mj2> [out.ser]    [-nogpu] [-quiet]
sertool verify     <in.ser.mj2>              [-nogpu] [-quiet]
sertool recover    <in.ser.mj2> [out.ser]    [-quiet]
sertool upgrade    <file.ser.mj2|folder>     [-quiet]
sertool info       <file.ser|file.ser.mj2>
sertool tree       <folder> [options]
sertool version
sertool help
Each command has a one-letter short form: c, d, v, r, u, i, t.
Exit status is 0 for success, 1 for failure and 2 for a usage error, which is what a batch file or a scheduled task needs. Errors print to stderr and progress to stdout, so sertool tree D:\ > run.log keeps the log and still shows problems on the terminal.
A bare file name on its own is treated as info. A capture dragged onto sertool, or opened with it, is reported on rather than refused — the only reading of sertool <file> that cannot destroy anything.
sertool version also says whether the GPU encoder is available on this machine, and why not if it is not.
sertool tree
The one most people end up living in: it takes a whole capture folder and works through it, smallest file first, deleting nothing that has not verified.
| Option | What it does |
|---|---|
-delete | Delete each source once its own file has verified. |
-dryrun | List what would happen and touch nothing. |
-stage <dir> | Write results to another disk first, then move them back once the source is gone. Implies -delete. |
-out <dir> | Put results here instead of beside each source. |
-existing <what> | skip, redo or verify. Default skip. |
-max <n> | Stop after n files. |
-log <file> | Append a timestamped record. |
-zip | Include .ser.zip archives. |
-mj2 | Also list the .ser.mj2 files already there. Nothing is compressed or deleted for one, but each is checked against the digests stored inside it unless -noverify is given. Use it to survey a folder of mixed captures and finished archives in one pass. |
-noverify | Skip verification. Also disables -delete. |
-nogpu | Use the built-in encoder even where a GPU is present. |
-quiet | Print nothing but errors. |
A first run on a folder you have not touched before:
sertool tree D:\Captures -dryrun
and then, once it says what you expect:
sertool tree D:\Captures -log D:\Captures\sertool.log
Sources are still there afterwards. Add -delete when you trust it.
The GPU
On Windows, with an NVIDIA card, frames above about a megapixel are encoded on the GPU, where that is faster. Below that size the built-in encoder is the quicker choice and is used instead, and there is no GPU path for RGB captures at all. Falling back is normal and correct, not a problem to fix.
The archive is identical either way. The GPU is a speed option, not a format option, and -nogpu (or clearing use GPU) only makes it take longer.
serview
A small player for .ser and .ser.mj2, installed alongside the others. It needs no MATLAB Runtime, which makes it the one to pass on with a capture to someone who has none of this installed.
serview capture.ser.mj2        play it
serview capture.ser -info      what the file holds, and whether FFmpeg is ready
Any media player will open a .ser.mj2, but a 16-bit capture shows every other frame black and the picture comes out nearly dark. serview drops the extra planes, stretches the brightness so the planet, Moon or Sun is visible, and plays at the rate the camera actually ran, from the capture's own timestamps.
The decoding and the window are ffplay's, part of FFmpeg — free, and a one-off install: winget install Gyan.FFmpeg, brew install ffmpeg or sudo apt install ffmpeg. serview checks that the build has what it needs and says so if not.
To make a double-click open a capture: servieww.exe on Windows, serview.app on macOS, and ./serview -associate on Linux, which also puts SER Tools in the applications menu.
A viewer, not a converter. For a 16-bit capture serview shows the top 12 bits, which is the picture, and leaves the rest; a one-shot color capture is shown before white balance. For the exact pixels, open the archive in SER Tools or with sertool.
What a .ser.mj2 is
A .ser.mj2 is Motion JPEG 2000 with one extra metadata box. Any JPEG 2000 decoder already reads the pixels.
That matters for archives you intend to keep. sertool can always turn one back into the exact .ser it came from, but you should not have to depend on sertool still existing — so the format is written down in full, and anyone is free to implement it. The specification covers the container, the metadata box field by field, the pixel layouts and how to check a file against the checksums it carries, with working C for the parts specific to this format.
It is also why the saving is as large as it is. A general-purpose archiver sees a .ser as a stream of bytes and has no idea those bytes are pictures, so there is very little for it to find. The .mj2 encoder is built for images and models each frame in two dimensions, which typically lands it well below a zip of the same capture.
Keeping your captures safe
The rules the program follows, so you know what it will and will not do:
- Nothing is deleted unless that file verified. Not the run, the file: one capture failing costs you nothing but its own disk space.
- delete sources is off until you turn it on, and turning verification off turns deleting off with it.
- Compression is lossless. Nothing is resampled, requantized or re-encoded to a lossy format. Every pixel comes back exactly as captured.
- Verification is a real read-back, not a checksum of what was just written from memory.
Even so: SER Tools is provided free of charge and without warranty of any kind, and irreplaceable data deserves a backup that does not depend on any one tool. Try it on copies first, satisfy yourself that the results decompress correctly, and keep a second copy of captures you cannot retake.
Installing and updating
Each platform has its own installer, and each needs the free MATLAB Runtime, which the installer downloads if it is not already there.
- Windows — a Start menu entry for the window, and
sertoolat a command prompt. The programs are code-signed. - macOS — for Apple silicon. Signed and notarized by Apple, so it opens without a Gatekeeper warning.
./sertoolin Terminal, andserview.appfor the Finder. - Linux — installs under
/usr/local../sertooland./serToolsAppfrom its folder, and./serview -associateputs both in the applications menu.
Check for update on the About tab says whether a newer version is out.
See also the SER Tools overview, the SERZ format specification and the full BiggSky manual.